Commands
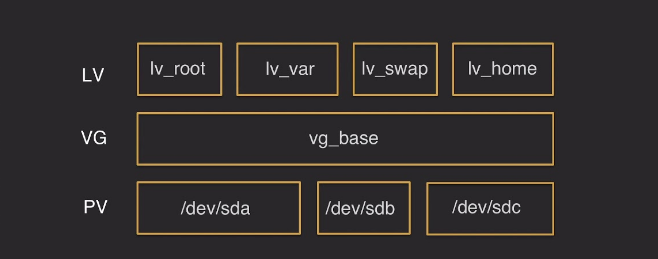
LVM
LV/VG/PV


Get more info about LVM
Display and show Physical Volumes
Display and show Volume Groups
Display and show Logical Volume
Steps to add a physical disk or new partition to LVM
lsblk -f
df -Th
fdisk /dev/sda
F
n
l
find 8e (lvm)
t
8e (lvm)
w
mkfs.ext4 /dev/sdb[x]
pvcreate /dev/sdaX
vgextend vg-name /dev/new-partition
lvextend -L [final-partition-size] /dev/VGname
lvextend -L 99G /dev/ubuntu1804-vg/root
resize2fs /dev/vg-name/lv-name
Create a new Logical Volume
Create a new Logical Volume
Make a filesystem for it
Temporary mounting
- Mount it to wherever you want
Permanent mounting
- Append this line of code to
/etc/fstab
LVM snapshot
write a new partition on disk
# Check the free space and partitions with mount point
lsblk
df -h

# Create a new partition on the disk
fdisk /dev/sd{a..z}
n
p / e
choice partition number
choice partition first sector
choice partition last sector
w
mkfs.ext4 /dev/sd{a..z}{1..n}
Mount Option
# Show mounted partitions
fdisk -l
mount | column -t
df -h

# findmnt
findmnt -l
findmnt -D
findmnt --fstab /home

# Mount temporary
mount /dev/sd{a..z}{1..n} /xyz

# Mount permanently via fstab
1. Add new disk (usually /dev/sdb)
2. Create new partition on disk
3. Format partition with new FS (mkfs.ext4 /dev/sdb[x])
4. Mount a specific path to new partition
5. Edit `fstab` for mount permanently
Get partition info
List of partitions and mounted path
List of ID and UUID of devices
Get the list of a partition
tune2fs -l /dev/sda2

# Filesystem volume name
# Last mounted on
# Filesystem UUID
# Filesystem magic number
# Filesystem revision
# Filesystem features
Change left root password
# Mount chroot shell - change password
1. Boot the Ubuntu Live CD.
2. Press Ctrl-Alt-F1
3. sudo mount /dev/sda1 /mnt
4. If you created a custom partition layout when installing Ubuntu you have to find your root partition using the `fdisk -l` utility. See the section Finding your root partition.
5. sudo chroot /mnt
Users and Groups
Users
Difference between useradd and adduser:
useradd is native binary compiled with the system. But, adduser is a perl script which uses useradd binary in back-end.
adduser is a perl script and more user friendly and interactive than its back-end useradd. There's no difference in features provided.
adduser is a wrapper for useradd
Add user
# Add a new user with home directory
useradd -m mehrdad

# Add a new user with group and default shell
useradd -m mehrdad -g mehrdadgrp -s /bin/zsh

# Delete an existing user with home folder
userdel -r mehrdad

# List of users that user has already added
groups mehrdad
Changing owner
# Change owner of file
chown user_name file_name

# Change group and user owner:
chown group_name:user_name file_name

# change owner/group of a directory
sudo chown -R username:group <directory-name>
Lock and Unlock an user
# automatically
usermod -L mehrdad
usermod -U mehrdad

# manually
vim /etc/passwd
root:x:0:0:root:/root:/sbin/nologin
root:x:0:0:root:/root:/usr/sbin/nologin
Kill user in another session
Grep all active users
check user exists
Groups
# Add a new group
grpadd

# Add an existing user to a specific group
usermod -aG grp_name user_name
gpasswd -a user_name grp_name

# Change group owner of file
chgrp group_name file_name
chown :group_name file_name
Archive & Compression
TAR
# Create TAR file
tar -cf file-name.tar file/directory

# Extract tar.xz file
tar -xf 1.tar.xz

# Extract tar.gz file
tar -xvzf 1.tar.gz

# Extract tar.bz file
tar -xvf 1.tar.bz
XZ
# Add directory into the XZ compress file
tar cf - directory-name | xz -z > archive-name.tar.xz

# Create/Extract one file to XZ file
xz -z ramz.txt.gpg
xz -d ramz.txt.gpg.xz #

# Create `XZ` file into the another file
xz -z ramz.txt.gpg > ramz.txt.gpg.tar.xz

# Compress existed TAR file
xz --compress images.tar
GZ
BZIP2
systemd
- Get the list of services(units)
- Get the list of unit files
- Add service to startup
- Mask service to prevent start
- UnMask service to prevent start
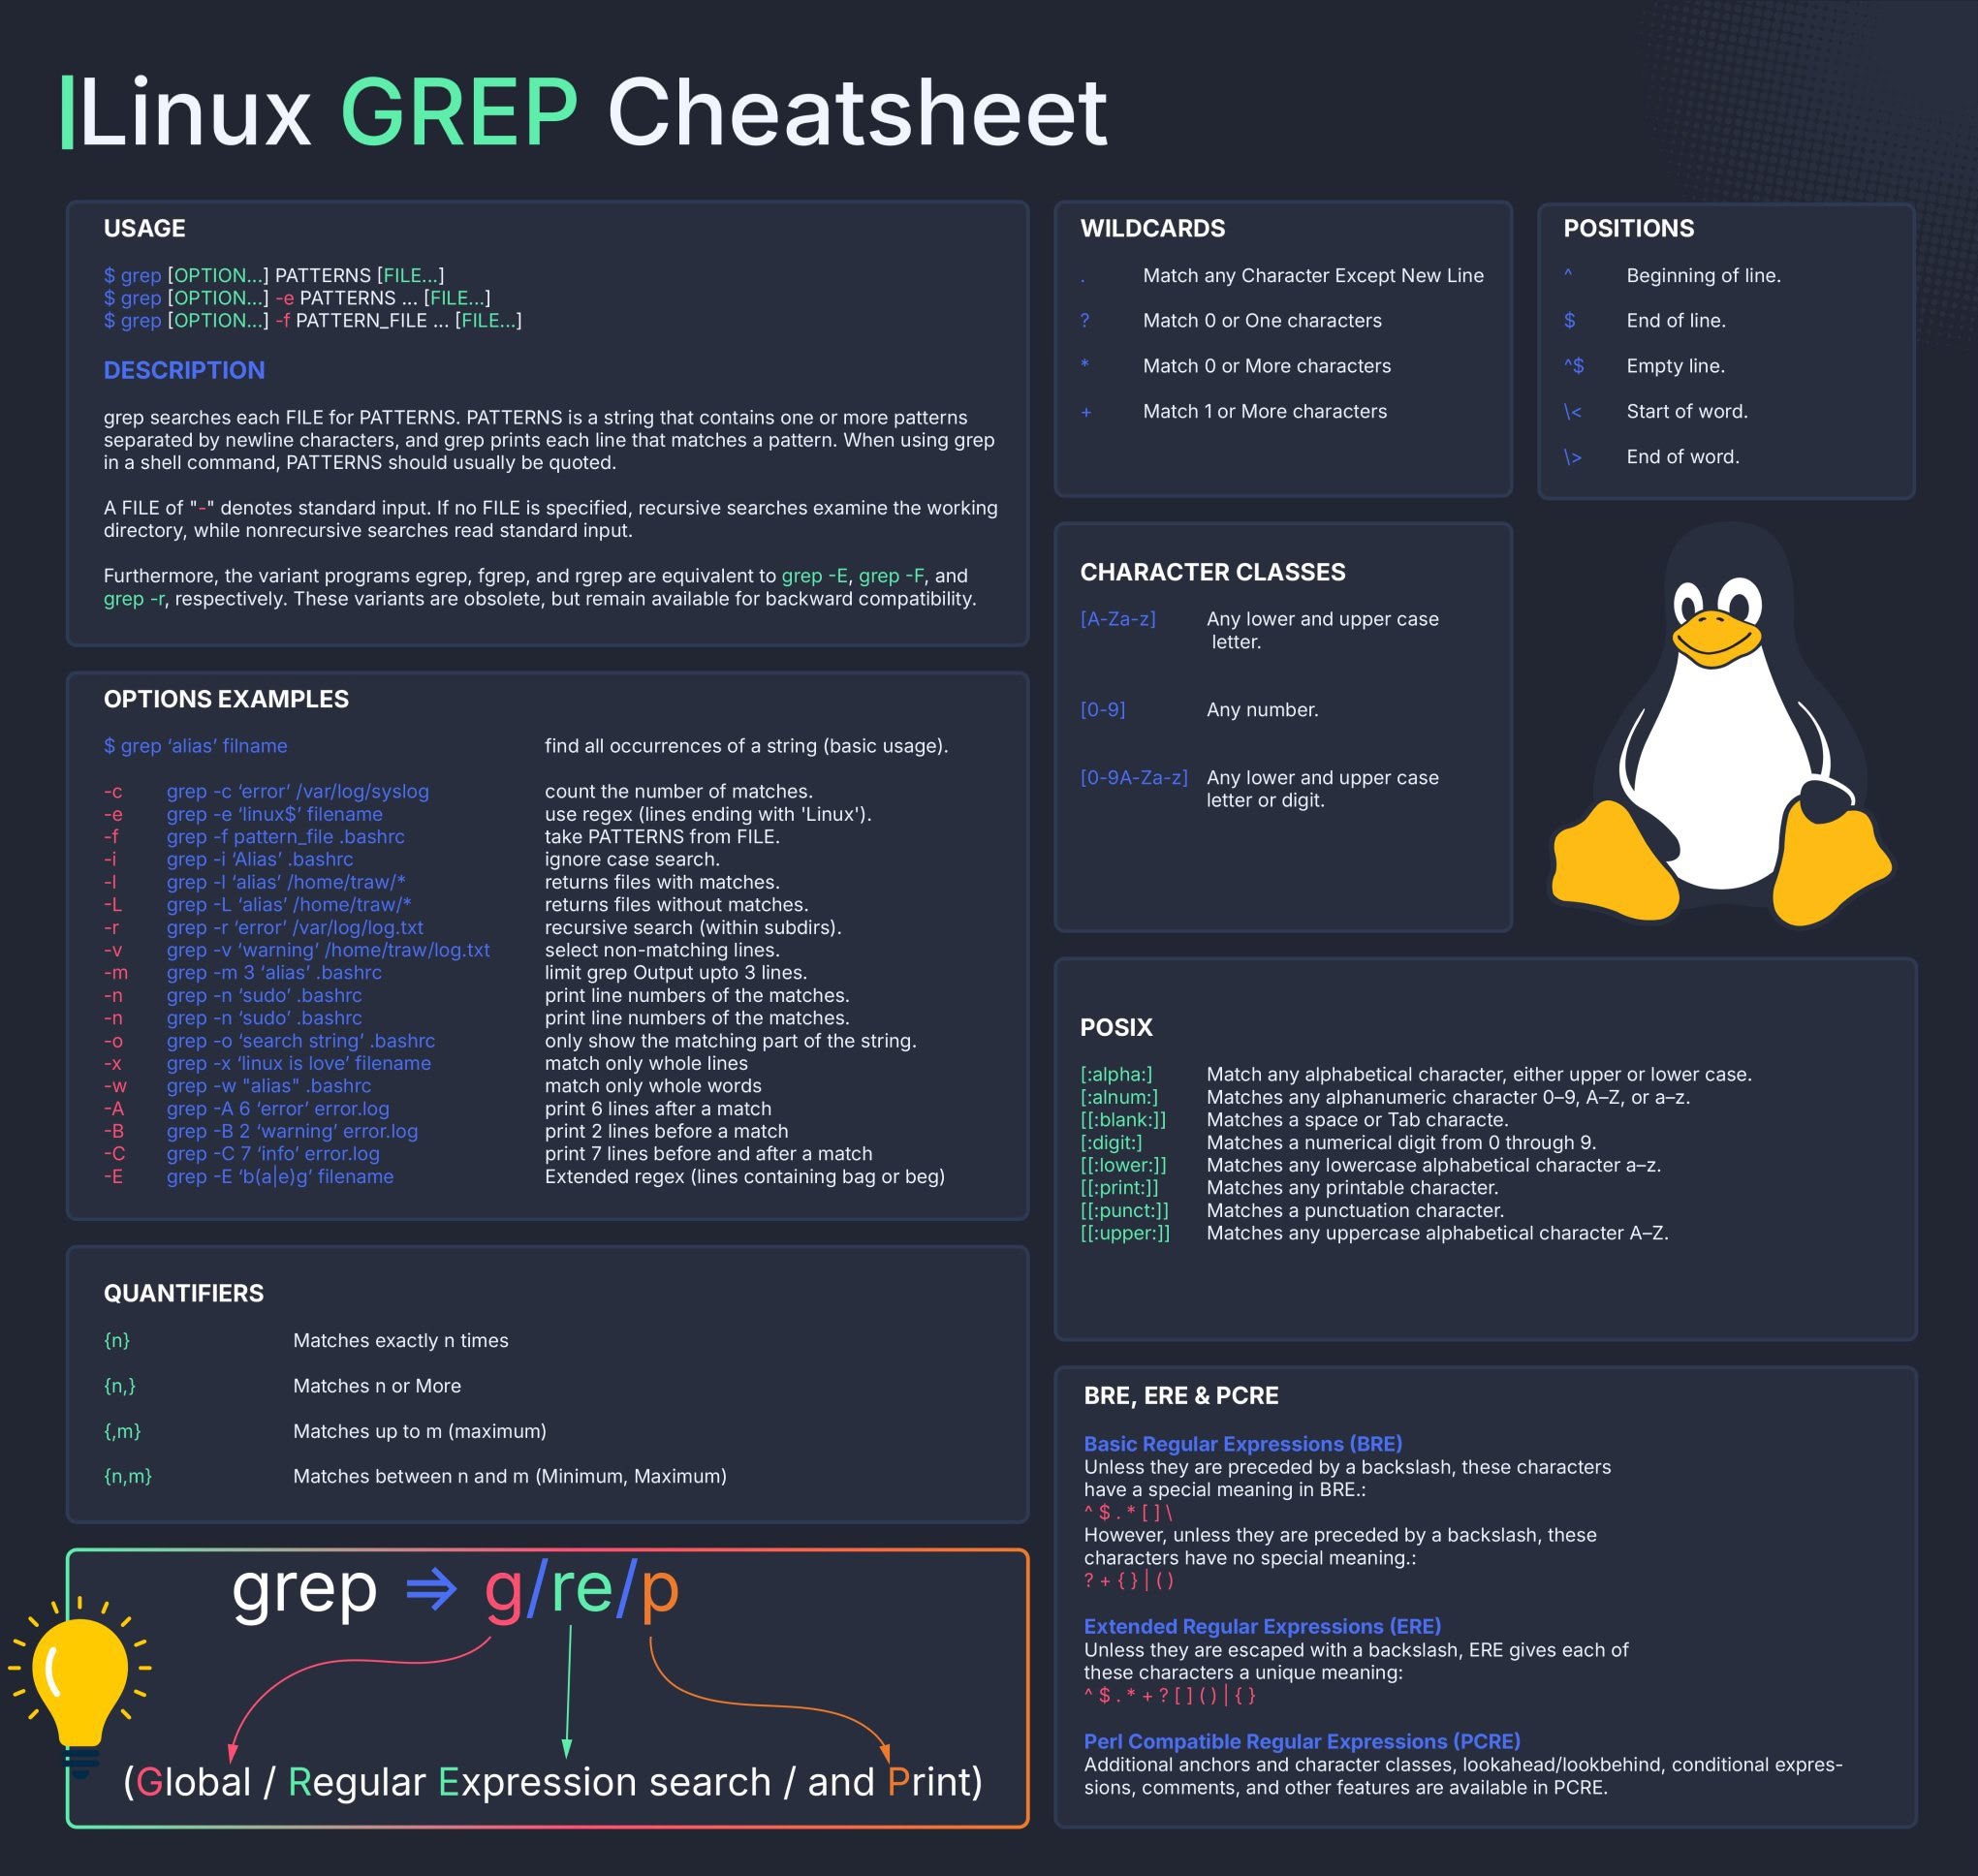
grep
GREP CheatSheet
# Reverse grep
grep -v

# count target
grep -c

# grep with line number
grep -n

# grep case insensitive
grep -i

# first line character
"^"

#end line character
"$"
or
-e
|
Remove the shared line from file 1
-Fبرای استفاده از متن ساده (بدون regex)-xبرای تطبیق کامل خط-vبرای نمایش خطهایی که در فایل دوم نیستند-ffile2.txt برای مقایسه با محتوای فایل دوم
sed
sed switch
- s (substitute match pattern)
- g (global sub)
- 3g (after 3th character sub)
- -e (selected items)
- & (same characters)
- -i (save to file)
- -r (extended regex)
- #linenumber (each line that you want to apply sed)
- #` (each line that you don't want to apply sed)
- d (delete matched pattern)
- -p (print matched pattern)
- I (case ignore flag)
comm
Compare two sorted files line by line
Remove the sharing area from file one
NOTE
Files must be sorted before, if didn't use this command
Schema of comm 23

dos2unix
Cat the file to see the end-of-line characters
Convert \r\n to \n
\r= Carriage Return (بازگشت هد چاپگر به ابتدای خط)\n= Line Feed (حرکت هد چاپگر به خط بعدی)
sudoer
Add password-less sudoer
sudo bash -c 'echo "mehrdad ALL=(ALL) NOPASSWD:ALL" > /etc/sudoers.d/mehrdad'
sudo chmod 0440 /etc/sudoers.d/mehrdad
Verify it works
Should print "root" without asking for password
force edit visudo
Monitor Resources
open ssl
Create a new CERT file via openssl
Create a new PrivateKey
openssl [key_type [genrsa]] -out /path/to/dir/self_priv_key.key 2048
or
openssl genpkey -algorithm RSA -out /path/to/dir/self_priv_key.key 2048
Create Self-Sign Cert with Private-Key
openssl req -x509 -new -days 3650 -key /path/to/dir/self_priv_key.key -out /path/to/dir/self_sing_cert.crt
Open CERT file to show content
Open RSA PrivateKey file to show content
Create a self-sign Kubernetes ApiServer certificate
- The private-key has been created before
- we must use kubernetes valid CA (-CA ca.crt -CAkey ca.key)
openssl req -x509 -key /etc/kubernetes/ssl/apiserver.key -out /etc/kubernetes/ssl/apiserver.crt -days 365 -CA ca.crt -CAkey ca.key -subj "/CN=kubernetes" -addext "subjectAltName=DNS:kubernetes,DNS:kubernetes.default,DNS:kubernetes.default.svc,DNS:kubernetes.default.svc.cluster.local,DNS:lb-apiserver.kubernetes.local,DNS:localhost,DNS:node1,DNS:node1.cluster.local,DNS:node2,DNS:node2.cluster.local,DNS:node3,DNS:node3.cluster.local,IP:10.233.0.1,IP:172.16.2.10,IP:192.168.1.101,IP:127.0.0.1,IP:192.168.1.102,IP:192.168.1.103,IP:192.168.1.10"
curl
A ton of curl examples is here
# download with curl
curl -C - -L -O URL

# Explain arguments
-C, --continue-at <offset>
      Continue/Resume a previous file transfer at the given offset.
-L, --location
      (HTTP) If the server reports that the requested page has moved to a different location
-O, --remote-name
      Write  output to a local file named like the remote file we get.
'-',  Read from std-in
aria2
aria2c -c -s 16 -x 16 -k 1M -j 1 -i dl.txt

-c, --continue [true|false]
-s, --split=<N>
-x, --max-connection-per-server=<NUM>
-k, --min-split-size=<SIZE>
-j, --max-concurrent-downloads=<N>
-i, --input-file=<FILE>
Watch the OS installation date and time
Print Format Date
date +%<format-option>
Check for Installed Libraries
Set and Get from Clipboard
Test bpcopy command
Watch these steps
![pic5][linux-commands-cheat-sheet]